Ring Alarm Base Station with the Keypad and Stick Up Cam on a console in a modern home

Panic Button (2nd Gen) Setup and Use

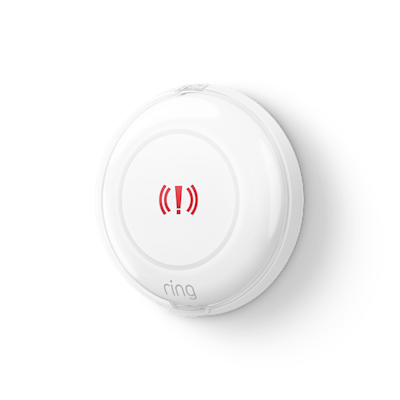
Ring Alarm Panic Button (2nd Generation) allows Ring Alarm owners to immediately request¹ an emergency response through their Ring Alarm system. A Ring Home Standard or Premium Plan is required to add Alarm Professional Monitoring (sold separately).

When held for three seconds or more, the Panic Button will send a message to the Ring Alarm or Alarm Pro Base Station that urgent help is needed. After receiving a Panic or Fire signal from the Panic Button, the Base Station will sound the Ring Alarm siren. The Base Station does not sound a siren when a medical Panic Button is pressed.

Panic Button (2nd Generation) features:

  • Use the Ring app to configure buttons and choose which emergency response
    1
    will be requested when you use Panic Button during setup or from the device dashboard:
    • Panic (police response)
    • Medical response
    • Fire response
  • Its compact size makes Panic Button easy to place in a convenient location at your home or business like the kitchen, bedroom, bathroom or breakroom.
    • IMPORTANT:
      Smoke and carbon monoxide monitoring is
      not
      available for commercial properties.
  • Panic Button’s clear cover helps reduce the chance of accidentally pressing Panic Button.

Setting up your Ring Alarm Panic Button (2nd Generation)

1. Set up the device in the Ring app

  1. Open the main menu in your Ring app by tapping the 3-lined icon in the upper left-hand corner.
  2. Tap
    Set Up a Device.
  3. Tap
    Security.
  4. Tap
    Panic Buttons
    and then select
    Panic Button For Ring Alarm (2nd Gen).
  5. Tap
    Ready
    to proceed with the on-screen instructions.

2. Scan the QR code on your device

  1. Tap the
    Scan QR Code
    button.
  2. Turn over your Panic Button.
  3. Use your mobile device to scan the QR code on the back of your Panic Button.
  4. If your mobile device is not scanning the QR code, you can enter the 5-digit PIN next to the QR code.
  5. Continue to follow the on-screen instructions.

The QR code and PIN can also be found in the product packaging of your Panic Button.

3. Pull out the clear tab

IMPORTANT: The Panic Button can trigger an alarm as soon as it’s paired with your system. Treat the Panic Button with care to avoid false alarms after you pull out the tab.

When prompted by the Ring app, pull the clear tab from the back of the device to turn on the Panic Button. Your Alarm or Alarm Pro Base Station should find the device automatically.

As the Panic Button attempts to pair with your Alarm or Alarm Pro Base Station, the LED light will rapidly blink green. Once pairing is complete, the LED will glow green for three seconds.

Panic Button (2nd Gen) did not pair successfully

If the Panic Button does not pair successfully, the LED light will blink red. Try the pairing process again by following the in-app instructions. When it’s time to pull the battery tab, simply remove and reinsert your battery to complete the process.

4. Choose the type of Response for your Panic Button

Proceed with the setup of your new Panic Button in the Ring app by assigning it a name and room. Next, you’ll choose the type of response that should trigger when you press your Panic Button:

  1. Tap
    Continue
    .
  2. Select the type of response the Panic Button should trigger when pressed,
    Panic (police), Fire, or Medical
    , then tap
    Continue
    .
  3. When the Panic Button response type has successfully saved, you’ll see a green check mark on your screen. If not, tap the
    Got It
    button to try again.
  4. If you’d like to change your Panic Button’s response type after setup is complete, tap
    Devices
    on the Ring app main menu, then
    Security
    , then your Panic Button (check the name), then tap the
    Button Setting
    tile.

Use Panic Button stickers to remember which response the button will trigger

Fire and medical stickers are provided with your Panic Button (2nd Generation) to help you keep track of the response it triggers. Peel and stick the corresponding fire or medical sticker to the Panic Button’s clear plastic safety cover.

5. Complete the communication test

Once you've chosen a response type, you must confirm that it can communicate with the Base Station. To complete the communication test, follow these instructions:

  • Make sure Test Mode is turned on before you start the communication test.
  • Press and hold the Panic Button until the LED blinks red and green. This test will not set off your alarm siren.
  • If the LED blinks red and green, the Panic Button is connected and ready to go.
  • If the LED blinks red, you can try the test again or try repositioning the device closer to the Base Station. You can also use a
    to strengthen communication.

The communication test can also be completed at any time from the Advanced Options tile of the Panic Button device profile in the Ring app¹:

  1. Open the Ring App
  2. Tap the
    Menu (☰)
    on the top left.
  3. Tap Alarm or Alarm Pro Base Station under
    Security
    , then select your Panic Button.
  4. Tap
    Device Settings
    .
  5. Tap
    Advanced Options
    .
  6. Tap
    Retry Connection.
  7. Tap the Setup button found inside the battery compartment to verify that your Panic Button is able to communicate with your Base Station.

6. Place the Panic Button

Once your Panic Button is installed, place it in an area of your home or business where it is easily accessible during an emergency. Tips for placing your Panic Button

  • Make sure you place your Panic Button close enough to your Base Station to ensure it stays connected.
  • Place your Panic Button on a flat surface or hang it on a wall.
  • Keep your Panic Button out of reach of small children and pets.
  • Place your Panic Button somewhere it won’t be triggered by accident.

Suggested locations for placing your Panic Button

  • On the nightstand in your bedroom.
  • In the bathroom in case there is a fall or medical emergency (especially if you have an elderly family member).
  • In or near the kitchen to call for help in case of a fire-related emergency.¹
  • In the room where you spend most of your time for police assistance in case of a break-in or other home security concern.
  • If you want to use a Panic Button at a business location (police and medical emergencies only), keep it in an area where you may need extra security for you, your employees, and your equipment.

Order enough Panic Button devices to ensure that you are covered throughout your home or business.

Using the Panic Button (2nd Generation)

The Panic Button has a safety cover that must be opened before pressing it to help reduce the chance of an accidental press and false alarms. Once the cover is removed, press and hold the button to call for help in the event of an emergency.

Get more information by reviewing Panic Alarm - False Alarm Tips.

What happens when you press your Panic Button

Pressing your Panic Button will trigger a different set of responses depending on the setting (panic/police, fire, or medical) you chose. Review the chart below to learn more about what will happen when Panic Button is pressed for each response type:

Panic Alarm (Police Response)
Fire Response
Medical Response
Self Monitoring
Base Station siren sounds.
Ring account owners and Shared Users receive a push notification.
Base Station siren sounds.
Ring account owners and Shared Users receive a push notification.
Base Station siren will not sound but the LED ring will flash.
Ring account owners and Shared Users will receive a push notification.
Base Station siren sounds.
Panic alarm signal is sent to the monitoring¹ center and they will follow the response plan.
Ring account owner and emergency contacts will receive a call from the monitoring center.
Ring account owner and Shared Users will receive a push notification.
Base Station siren sounds.
Fire alarm signal is sent to the monitoring¹ monitoring center and they will follow the response plan.
Ring account owner and emergency contacts will receive a call from the monitoring center.
Ring account owner and Shared Users will receive a push notification.
Base Station siren will not sound but the LED ring will flash.
Medical alarm signal is sent to the monitoring¹ center and they will follow the response plan.
Ring account owner and emergency contacts will receive a call from the monitoring center.
Ring account owners and Shared Users will receive a push notification.

Learn more about how Professional Monitoring Response Plans help keep you protected.

Replacing Panic Button (2nd Generation) battery

Always insert replacement batteries correctly, matching the + (positive) and - (negative) symbols on the battery with the symbols.

  1. Disarm your Ring Alarm.
    2
  2. Remove the back cover from the device by twisting the lid counter-clockwise until the top line moves to the unlock symbol.
    1. Depending on the type of Panic Button (2nd Generation) you have installed, you may need to use a Phillips #2 screwdriver to remove the battery security plate.
  3. Use a small tool, such as a micro screwdriver, to carefully remove the coin cell batteries from the casing of your Panic Button.
  4. Insert two new coin cell batteries (CR2032), taking care to match + and - symbols with the markings on your Panic Button.
  5. Replace the cover securely, twisting the cover on clockwise until it locks in place.

¹
Professional Monitoring is an add-on plan that first requires a compatible Ring Home subscription. Both sold separately. Service available within the U.S. (all 50 states, but not U.S. territories) and in Canada (excluding Quebec). Ring does not own its monitoring center. Smoke and carbon monoxide monitoring is not available for business or commercially zoned addresses. See Ring Alarm licenses at: ring.com/licenses. Additional fees may be required for permits, false alarms, or Alarm Verified Guard Response, depending on your local jurisdiction.
²
Ring Alarm and all Ring Alarm accessories require a compatible Ring subscription (sold separately) for digital arming/disarming and certain other in-app features.
Last updated 1 month ago