Setting up Ring Peephole Cam (Door View Cam) in the Ring App
Set up your Ring Peephole Cam (Door View Cam) in the Ring app with this step-by-step guide.
Download the Ring app
To download the Ring app:
- On your mobile device, go to the(for iOS devices) or the(for Android devices)
- Download and install the Ring app on your mobile device
Or visit ring.com/app on your mobile device.
Create or log in to your account
If this is your first Ring product, you will be asked to set up an account.
To set up an account:
- Open the Ring app.
- Select “Create Account.”
- Follow the in-app instructions to create a new account.
If you already have another Ring device installed, simply open the Ring app.
Tap 'Set Up a Device'
Tap Set Up a Device, then select Doorbells.
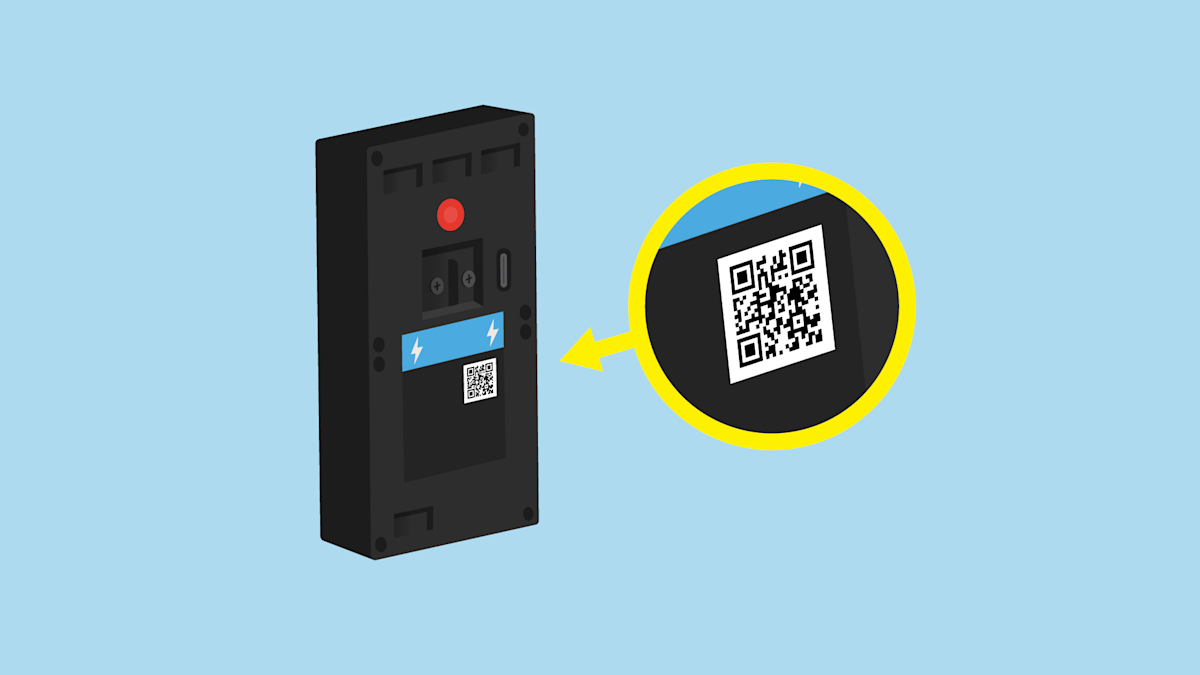
Scan the QR code on your Ring device
You can scan the QR code on your Ring device or product packaging via the Ring app.
- Tap theMenu(≡)on the left side of your Dashboard in theRing app.
- TapSet up a Deviceand selectDoorbells.
- TapI’m Ready to Scan.
- Point your smartphone’s camera at the QR code on your Ring device or product packaging. (Note:If you don’t see the QR code, please remove your video doorbell’s faceplate).
- Center the code in the phone camera’s view at the bottom half of the screen.
- When the code is recognized, a green square will appear and a pop-up with your device image detected.
If you experience issues scanning the QR code, please follow these steps:
- Move your camera closer or further from the QR code to help it focus.
- Once your camera finds focus, hold it steady for a few seconds.
- If your camera won’t focus, clean your camera lens, move to a well-lit area, and try again.
If you continue to experience issues, please follow these additional steps:
- TapOther Optionsbelow the scanner.
- SelectCan’t Scan the QR code.
- Confirm by selectingEnter code manually(this corresponds to PIN code digits underneath the QR code).
- Find your device in the list.
- Enter your five digit PIN which can be found below the QR code.
Specify your location
If this is your first time setting up a Ring device, you will receive a request from your phone informing you that the Ring app wishes to use your phone’s location services to pinpoint your location. Allowing the app to do so will assist with inputting your address.
Enter your address information into the app, then confirm it.
If you have established a location previously, you can select it from the list of your locations.
Tap here to learn more about Ring devices and why your address is needed.
Name your device
Select a specific name for your Ring Peephole Cam (Door View Cam) to distinguish it from other Ring devices on your account. You can choose one of the default names that are suggested, or you can enter your own by selecting “Custom…” at the bottom of the list.
Put your Peephole Cam (Door View Cam) into setup mode
Press and release the button on the indoor portion of your Ring Peephole Cam (Door View Cam). Then tap the “Continue” button in your Ring app.
Connect to your Ring device
The Ring wifi network is a temporary access point that you join briefly during the setup of a Ring device. After you connect to the temporary Ring wifi network, you will connect to your own home wifi network. Then, you are no longer connected to the Ring network. Your smartphone may generate a message that says "no internet connection" or similar verbiage in the settings. This is not a cause for concern. You can safely join the temporary Ring wifi network access point and complete your setup.
iOS: Tap Join when the Ring app asks to join the Ring wifi network.
Android: Your device should automatically connect to the Ring wifi network.
If your device does not automatically connect to the Ring wifi network, or if you chose to continue without scanning in step four, please follow the steps below:
- Press the home button on your phone to leave the Ring app.
- Navigate to theSettingsapp, then tapwifi.
- On Android, you may need to navigate toConnectionthenwifi.
- Select the Ring wifi network from the list of available networks. The network will appear as either:
- Ring- followed by the last six digits of the MAC ID.
- Ring Setupfollowed by the last two digits of the MAC ID.
- Once connected, close yourSettingsapp and return to the Ring app.
Connect your Ring Peephole Cam (Door View Cam) to your wifi
Be sure you’re near your router and have your wifi password ready.
- Select your wifi network
- If you have more than one wifi network, select the network closest to where you will be installing your Ring Peephole Cam (Door View Cam).
- Enter your wifi password and pressContinue.
Note: After connecting to your wifi network, the LED lights may flash on your Ring Peephole Cam (Door View Cam) while it updates its internal software. Once the update is complete you can continue the setup. Please do not attempt to ring the Peephole Cam (Door View Cam) at this time, as it will further delay the update.
Test your device
Once your Ring Peephole Cam (Door View Cam) has completed its update and setup, push the front button to complete a test call. This will ensure your Peephole Cam (Door View Cam) is ready to function.
Installing your Peephole Cam (Door View Cam).
Configurez votre Ring Peephole Cam (Door View Cam) dans l'application Ring
Configurez votre Ring Peephole Cam (Door View Cam) dans l'application Ring à l’aide de ce guide étape par étape.
Téléchargez l'application Ring
Pour télécharger l’application Ring :
- Sur votre appareil mobile, allez sur(pour les appareils iOS) ou(pour les appareils Android)
- Téléchargez et installez l'application Ring sur votre appareil mobile.
Ou visitez le site ring.com/app sur votre appareil mobile.
Créer un compte ou ouvrir une session
S'il s'agit de votre premier produit Ring, vous serez invité à créer un compte.
Pour créer un compte :
- Ouvrez l'application Ring.
- Sélectionnez « Créer un compte ».
- Suivez les instructions dans l'application pour créer un nouveau compte.
Si vous avez déjà un autre appareil Ring installé, ouvrez simplement l'application Ring.
Tapez sur « Configurer un appareil »
Tapez sur Configurer un appareil, puis sélectionnez Sonnettes.
Balayez le code QR de votre appareil Ring
Vous pouvez balayer le code QR de votre appareil Ring ou de l'emballage du produit à l'aide de l'application Ring.
- Cliquez surles trois lignes (≡)situées du côté gauche de votre tableau de bord dans l'application Ring.
- Cliquez surConfigurer un appareilet sélectionnezSonnettes.
- Cliquez surJe suis prêt à balayer.
- Orientez la caméra de votre téléphone intelligent vers le code QR qui se trouve sur votre appareil Ring ou son emballage. (Remarque :Si vous ne voyez pas le code QR, veuillez retirer la façade de votre sonnette vidéo).
- Centrez le code dans la vue de l'appareil photo du téléphone, au bas de l'écran.
- Lorsque le code est reconnu, un carré vert s'affiche et une fenêtre contextuelle s'affiche avec l'image de votre appareil détectée.
Si vous ne parvenez pas à balayer le code QR, veuillez suivre les étapes suivantes :
- Rapprochez ou éloignez votre appareil photo du code QR pour l'aider à faire la mise au point.
- Lorsque la mise au point est effectuée, maintenez l'appareil immobile pendant quelques secondes.
- Si votre appareil photo ne parvient pas à faire la mise au point, nettoyez l'objectif de l'appareil, déplacez-vous dans un endroit bien éclairé et réessayez.
Si le problème persiste, veuillez suivre les étapes suivantes :
- Appuyez surAutres optionssous le numériseur.
- SélectionnezJe ne peux pas balayer le code QR.
- Confirmez en sélectionnantSaisir le code manuellement(qui correspond aux chiffres du code NIP sous le code QR).
- Repérez votre appareil dans la liste.
- Saisissez votre NIP à cinq chiffres qui se trouve sous le code QR.
Précisez votre emplacement
Si vous configurez un produit Ring pour la première fois, vous recevrez une demande sur votre téléphone vous informant que l'application Ring souhaite utiliser les services de localisation de votre téléphone pour trouver votre position. Permettre à l'application de procéder ainsi aidera à préciser votre adresse.
Saisissez votre adresse dans l'application puis confirmez-la.
Si vous avez déjà établi un emplacement, vous pouvez le sélectionner dans la liste de vos emplacements.
Donnez un nom à votre appareil
Choisissez un nom spécifique pour votre Ring Peephole Cam (Door View Cam) afin de le distinguer des autres appareils Ring dans votre compte. Vous pouvez choisir l’un des noms par défaut suggérés, ou vous pouvez saisir le vôtre en sélectionnant « Personnalisez… » au bas de la liste.
Mettez votre Peephole Cam (Door View Cam) en mode configuration
Appuyez sur le bouton en haut de votre appareil Ring Peephole Cam (Door View Cam), puis relâchez-le. Puis, cliquez sur le bouton « Continuer » dans votre application Ring.
Connectez-vous à votre appareil Ring
Le réseau Wi-Fi Ring est un point d'accès temporaire que vous utilisez brièvement lors de la configuration d'un appareil Ring. Lorsque vous êtes connecté au réseau Wi-Fi temporaire de Ring, vous vous connecterez à votre réseau Wi-Fi domestique. Ensuite, vous ne serez plus connecté au réseau Ring. Votre téléphone intelligent peut générer un message indiquant « aucune connexion Internet » ou un message similaire dans les paramètres. Il n'y a pas lieu de s'inquiéter. Vous pouvez rejoindre en toute sécurité le point d'accès temporaire du réseau Wi-Fi Ring et terminer votre configuration.
IOS : cliquez sur Rejoindre lorsque l'application Ring vous invite à joindre le réseau Wi-Fi de Ring.
Android : votre appareil devrait se connecter automatiquement au réseau Wi-Fi de Ring.
Si votre appareil ne se connecte pas automatiquement au réseau Wi-Fi Ring, ou si vous avez choisi de continuer sans effectuer de balayage à l'étape quatre, veuillez suivre les étapes ci-dessous :
- Cliquez sur le bouton d'accueil sur votre téléphone pour quitter l'application Ring.
- Passez auxParamètresde l’application, puis appuyez surWi-Fi.
- Pour un appareil Android, vous devrez peut-être aller àConnexionpuisWi-Fi.
- Sélectionnez le réseau Wi-Fi Ring dans la liste des réseaux disponibles. Le réseau apparaît comme suit :
- Ring– suivi de six derniers chiffres de l'ID MAC.
- Configuration Ringsuivie de deux derniers chiffres de l'ID MAC.
- Une fois connecté, fermez lesParamètresde l’application et retournez dans l'application Ring.
Connectez votre Ring Peephole Cam (Door View Cam) à votre réseau Wi-Fi
Assurez-vous d'être à proximité de votre routeur et d'avoir le mot de passe de votre Wi-Fi à portée de main.
- Sélectionnez votre réseau Wi-Fi
- Si vous avez plus d'un réseau Wi-Fi, sélectionnez le réseau le plus proche de l'endroit où vous installerez votre Ring Peephole Cam (Door View Cam).
- Saisissez le mot de passe de votre Wi-Fi et appuyez surContinuer.
Remarque: Après la connexion à votre réseau Wi-Fi, les voyants DEL peuvent clignoter sur votre Ring Peephole Cam (Door View Cam) pendant qu'elle met à jour son logiciel interne. Une fois la mise à jour terminée, vous pouvez poursuivre la configuration. Veuillez ne pas tenter de faire sonner la Peephole Cam (Door View Cam) à ce moment, car cela ralentira davantage la mise à jour.
Testez votre appareil
Une fois que votre Ring Peephole Cam (Door View Cam) a terminé sa mise à jour et sa configuration, appuyez sur le bouton à l'avant pour effectuer un appel test. Cela permet de s'assurer que votre Peephole Cam (Door View Cam) est prêt à fonctionner.