
Replacing batteries in Ring Alarm devices
You will receive a “low battery” warning in the Ring app when it is time to replace the battery/batteries in your Ring Alarm device.
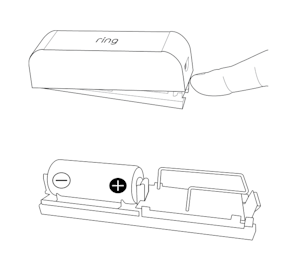
Replacing the Ring Alarm Contact Sensor batteries
Contact Sensor (2nd Gen)
Ring Alarm Contact Sensor (2nd Gen) uses two CR2032 batteries. To replace the batteries:
- Make sure your Ring Alarm is disarmed. ¹
- Remove the Contact Sensor by sliding it off of the mounting bracket.
- Remove the two batteries and insert new batteries.
- Slide the Contact Sensor back onto the mounting bracket until it clicks into place.

Contact Sensor (1st Gen)
Ring Alarm Contact Sensor (1st Gen) uses a CR123A battery. To replace the battery:
- Make sure your Ring Alarm is disarmed. ¹
- Remove the cover from the device by pressing the cover release button and lifting the battery cover.
- Remove the CR123A battery.
- Insert the new battery (match +/- symbols).
- Replace the cover securely.

Outdoor Contact Sensor
Ring Outdoor Contact Sensor uses two AA batteries. To replace the batteries:
- Make sure your Ring Alarm is disarmed. ¹
- Remove the Contact Sensor by sliding it off of the mounting bracket.
- Remove the battery cover.
- Remove the two batteries and insert the new batteries (match +/- symbols).
- Replace the cover securely.
- Slide the Contact Sensor back onto the mounting bracket until it clicks into place.


Replacing the Ring Alarm Motion Detector batteries
Motion Detector (2nd Gen)
The Motion Detector (2nd Gen) uses two AA batteries. To replace the batteries:
- Make sure your Ring Alarm is disarmed. ¹
- Slide the device off the mounting bracket.
- Remove the two batteries and insert the new batteries (match +/- symbols).
- Slide the device back onto the mounting bracket.

The Motion Detector can stay mounted during replacement.
Motion Detector (1st Gen)
The Motion Detector (1st Gen) uses one CR123A battery. To replace the battery:
- Make sure your Ring Alarm is disarmed. ¹
- Remove the cover by pressing the top tab.
- Remove the battery and insert the new battery (match +/- symbols).
- Close the cover.

Replacing the Ring Smoke & CO Listener battery
The Smoke and CO Listener uses a CR123A battery and can stay mounted during replacement. To replace the battery:
- Make sure your Ring Alarm is disarmed. ¹
- Turn the lid counterclockwise and lift to remove.


3. Remove the old battery from the base and insert a new battery with the plus (+) and minus (-) symbols facing up.

4. Align the lid’s semicircle with the “open” mark.
5. Turn clockwise until it clicks.
6. Test your Ring Smoke & CO Listener after replacing the battery. Learn more about testing Ring Alarm Smoke & CO Listener.
Replacing the Ring Alarm Panic Button battery
Panic Button (2nd Gen)
Ring Alarm Panic Button (2nd Gen) uses two CR2032A batteries. To replace the batteries:
- Make sure your Ring Alarm is disarmed. ¹
- Remove the back cover from the device by twisting the lid counterclockwise until the top line moves to the unlock symbol.
- Use a small tool to remove the coin cell batteries.
- Insert two new batteries (match +/- symbols).
- Replace the cover, turning clockwise until it clicks.

Panic Button (1st Gen)
Ring Alarm Panic Button (1st Gen) uses one CR123A battery. To replace the battery:
- Make sure your Ring Alarm is disarmed. ¹
- Remove the cover from the device by twisting the lid counterclockwise.
- Remove the CR123A battery.
- Insert the new battery (match +/- symbols).
- Replace the cover, turning clockwise until it clicks.


Replacing the Ring Alarm Flood & Freeze Sensor battery
The Flood and Freeze Sensor uses one CR123A battery. To replace the battery:
- Make sure your Ring Alarm is disarmed. ¹
- Remove the cover.
- Remove the CR123A battery.
- Insert the new battery (match +/- symbols).
- When the sensor is successfully paired, the LED will glow blue for three seconds.
- Align the lid’s semicircle with the “open” mark.
- Replace the cover, turning clockwise until it clicks.

Replacing the Ring Alarm Glass Break Sensor battery
If you get a "low battery" notification in the app, it's time to replace the battery. To replace the battery on your Glass Break Sensor:
- Make sure your Ring Alarm is disarmed. ¹
- Twist off the back cover.
- Remove the old AA batteries.
- Insert the new battery (match +/- symbols).
- Close the cover by twisting until the lock arrow points toward the lock symbol.
