Installing and using Ring Alarm Keypad
Learn about Ring Alarm Keypad features, the setup process, and how to use it to arm and disarm your Ring Alarm system.
Installation manuals
View or download the user manual for Ring Alarm Keypad (1st Gen).View or download the technical manual for Ring Alarm Keypad (1st Gen) - (English - US/CAN).View or download the user manual for Ring Alarm Keypad (2nd Gen) - (English - US/CAN).View or download the user manual for Ring Alarm Keypad (2nd Gen). |  |
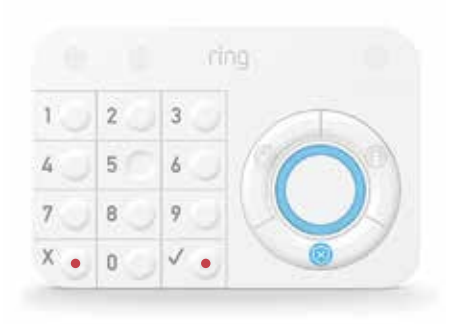
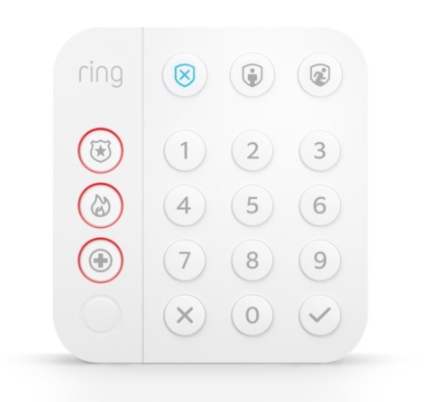
Keypad (1st Gen) | Keypad (2nd Gen) |
Keypad features
- Mounting:You can mount the Keypad on a wall or place it on a table near a door you use often.
- Power:The Keypad connects to power using the included USB power supply and cable, and you can use it plugged in or unplugged. It takes a few hours to charge the internal rechargeable battery, and it should last for about seven months, depending on usage.
- Siren:The Ring Alarm Keypad acts as a second siren that sounds when your Ring Alarm is triggered.
- Duress:Set a duress code that can appear to disarm the alarm and trigger a police emergency response (24/7Professional Monitoring1required).
- Chirps:Turn on chirp tones in the app under the Keypad settings page to hear when a sensor is triggered.
Additional Keypad specifications
Keypad (1st Gen)
- Trigger the Panic Alarm by pressing the ✔ and X buttons. Sounds the siren and triggers a police emergency response (24/7Professional Monitoring1required).
- Bypass sensors when you press the ✔ button.
- Adjustable volume for chirps and announcements.
Keypad (2nd Gen)
- (press and hold for three seconds).
- New Keypad buttons and LEDs provide tactile and visual cues.
- Smaller, improved design makes it easier to mount and use.
Setting up your Alarm Keypad
If you're planning to use the Keypad unplugged, make sure to fully charge it first. Before installing your Keypad, set it up in the Ring app. Learn more about setting up and managing your Alarm devices in the Ring app.
Installing your Alarm Keypad
You can mount your Alarm Keypad on a wall or place it on a flat surface.
Tips for placing or mounting your Keypad
- Install your Keypad near the doors you use most often.
- Consider installing an additional Keypad in an upstairs bedroom or basement family room for convenient arming and disarming.
- Don’t use the Keypad outdoors or in environments with extreme hot or cold temperatures.
- Don’t use the Keypad inside detached garages, warehouses, or sheds. Alarm devices should always be used in the same building as the Base Station.
- Don’t use the Keypad near water or chemicals.
- Keep the Keypad out of the reach of small children and pets.
Follow these steps to install your Keypad:
Placing on a flat surface
- Slide the bracket off the back of the Keypad.
- Flip the bracket over and slide it back onto the Keypad.
- Place the Keypad onto a flat surface. It will be slightly angled up for easier use.
Mounting to a wall
- Slide the bracket off the back of the Keypad.
- After you've decided where you want to install the Keypad, use the bracket to mark the drill holes. If installing on drywall: Use a 3/16 in. (5 mm) drill bit to pre-drill holes, then push the anchors into the holes.
- Use a Phillips head screwdriver and the included screws to attach the mounting bracket to the wall.
- Slide your Keypad onto the bracket.
Arming and disarming using your Ring Alarm Keypad
Keypad (1st Gen)
Keypad (2nd Gen)
Learn more about arming and disarming your Ring Alarm Keypad.
Adjusting Ring Alarm Keypad Power Save Mode
Get the most out of your Keypad by understanding its Power Save Mode and how it works to maximize your device’s energy usage.
- Plugged in:Current mode buttons light up when motion is detected. Numbers light up when it’s dark or motion is detected.
- Battery, with power save on:Current mode buttons light up when a button is pressed.
- Battery, with power save off:Current mode buttons light up when motion is detected. Numbers light up when it’s dark or motion is detected.
To turn on Power Save Mode:
Open the Ring app to the main dashboard.
Tap the Alarm tile under Devices.
Tap Connected Devices.
- Select theKeypad.
- Switch on thePower Save Modetoggle.
