Security camera setup guide
Follow these steps to set up your Ring security camera in the Ring app.
Before setup
- If your camera is battery or solar-powered, fully charge the battery first.
- Have your wifi password ready.
- or sign in.
Troubleshooting security camera setup
If you are having trouble with any part of setup, check out how to fix setup issues.
Step 1: Starting the in-app setup process
You will need to use the app to set up your Ring security camera.
Open the Ring app to the main dashboard.
Tap Set Up a Device at the bottom of the screen.
- SelectSecurity Cams.
Step 2: Scanning the QR code
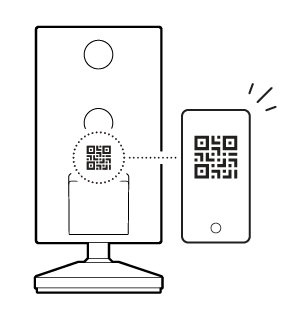
The app will prompt you to scan the QR code on your security camera.

1. Locate the QR code on the back of the device or beneath the battery compartment.
- If you can’t find the QR code, tap the help icon (?), and select your device model to help you locate the QR code.
2. Tap I’m Ready to Scan and scan the QR code with your mobile device. The app will automatically move to the next step once the QR code is successfully scanned.
- If the QR code doesn’t scan, tapOther Optionsand try scanning the barcode, or enter the PIN located below the QR code.
Step 3: Adding your location
You will be prompted to create a new location for your address, or select an existing location if you previously created one. If you need to create a new location in the app:
1. Tap Add a New Location.
2. Tap Add Location.
3. Tap Continue.
4. Select Home or Business, then tap Continue.
5. Enter your address and tap Continue.
- You can tapUse my current locationto find your address using your smart device’s location services. If you are prompted to enable location permissions, allow them.
6. You can drag the pin around on the map to your exact location. Tap Use This Address to proceed.
7. Enter a name for the location, and select Save Location.
If you already have a location created in the app:
- Tap on the location in the list of options.
- TapContinue.
Step 4: Choosing a name for your security camera
Name your camera so you can easily identify your device and its notifications.
- Select a pre-set name for your device, or tapCustomto create a custom name.
- TapContinue.
Step 5: Preparing your security camera for setup
You will be guided through device-specific steps for preparing your camera for setup.
- For battery-powered security cameras: Follow the in-app instructions, such as making sure your device is charged, removing the protective film, and more.
- For hardwired-only cameras: Follow the step-by-step tutorial in the app to prepare, install, and power on your camera.
Step 6: Connecting to the security camera for setup
Press the setup button on your camera when prompted by the app. This step creates a temporary wifi network for completing setup. Keep your mobile device close to the camera until setup is complete.
1. Press the setup button on the device. The light on the camera will begin to flash.
- The setup button is located either inside the removable cover on the bottom or on top of the camera.
2. Tap Light is flashing in the app.
- iOS: When the app asks to join the Ring wifi network, tapJoin.
- Android: The app will automatically try to connect to the Ring wifi network. If it does not connect, you will be prompted to select the Ring wifi network, or you will be asked to tapConnect.
3. If the app is able to connect to the security camera, the app will show a list of detected wifi networks.
Step 7: Connecting the security camera to your wifi
The app will show a list of wifi names to choose from. Keep your mobile device close to the camera until setup is complete.
- Select your wifi network.
- Enter your wifi password and tapContinue.
- Watch the light patterns on the security camera and listen for audio messages.
- Once setup is complete, tapContinue.
Your device will update to the latest firmware, if necessary, which could take a few minutes.
Warning! Do not remove your Ring device from power or press the setup button while your Ring device is updating.
Step 8: Completing setup and customization
The app will suggest multiple options for you to customize your camera, such as adding Shared Users, adjusting motion settings, and more.
If you have a battery-powered security camera, the app will give instructions on how to install your camera at your home or business.
View the manual for installing your security camera.
