Physically Setting Up Your Ring Jobsite Security Case

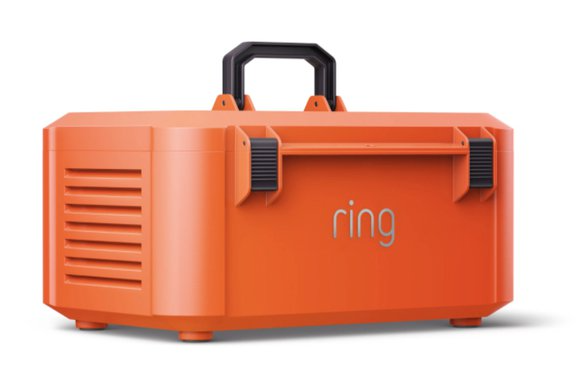
The Ring Jobsite Security Case is a protective case designed to let you to use the Ring Alarm Pro and two Ring Power Pack backup batteries.
Note: Ring Power Packs and Quick Release Battery Packs may be sold separately.
Case features
 | Outside the case - Protection and mounting options 1. The hardshell plastic exterior to help protect everything inside from possible damage. 2. An easy carry handle to grab and go. 3. A security padlock and key. 4. Secure latches to keep the lid closed. |
 | 5. A power cord used to power the internal fan and internal devices. 6. Mounting plates designed for floor or wall mounting (not shown). |
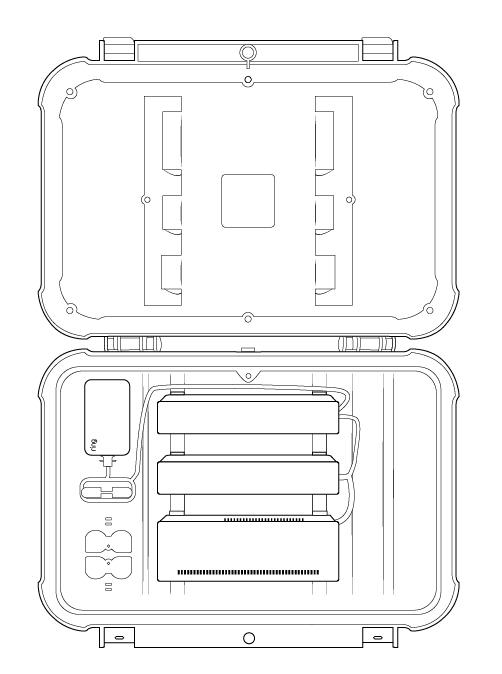
 | Inside the Case - Compartments for everything you need 1. A slot for your Alarm Pro so it sits snugly inside. 2. Two Ring Power Pack slots so you can provide battery backup for your Alarm Pro, for use when no power is available or during outages 3. An outlet for the Alarm Pro power adapter, and a cord organizer to keep it neat. 4. Charging compartment for Two Quick Release Battery Packs with LED lights to check on charging status. Quick Release Battery Packs can also provide backup power to the internal fan when there is no power available. 5. Internal fan to keep air circulating to reduce the chance of overheating. |
Using the fan
The built in fan will automatically circulate air inside the case to help reduce the chance of overheating.
Setting up your case
Make sure you’ve set up your Ring Alarm Pro in the Ring and eero apps before adding it to the case.
1. Ring Alarm Pro.
Insert your Alarm Pro correctly into the first compartment, using these steps:
- Turn the device so the top of the system is facing you and the bottom is facing the back of the case.
- Next rotate it so the USB-C power ports are on the right side.
- Make sure the air vents are not blocked.
2. Power Adapter. Plug the power adapter from your Ring Alarm Pro into the Alarm Pro’s Power-In port.
3. Plug in the case. Plug in the case’s power cord to a GFCI outlet.
4. Ring Power Pack (up to 2, optional, sold separately) Insert and setup your Power Packs correctly into the second and third slots, using these steps:
- Turn the device so the top of the Power Pack is facing you and the bottom is facing the back of the case.
- Next rotate it so the USB-C power ports are on the right side.
- Connect any Power Packs to your Ring Alarm Pro using the short, double-sided USB-C cable. Align the orange rounded USB-C end with the Power In port, and the blue squared USB-C end with the Power Out ports.
5. Quick Release Battery Pack (up to 2, optional, sold separately) Insert each one into the correct slot.
Wall mounting instructions
- Attach the mounting plate to the wall using the 4 screws and anchors included in Bag A.
- Attach the two hook brackets to the back side of the case using 2 screws per bracket included in Bag B.
- Similar to how you might mount a TV, slide the case onto the mounting plate using the hook brackets, then secure the case by inserting a screw from Bag B into the the top of each hook bracket.
 |  |  |
Floor mounting instructions
- Attach the floor mounting plates to the bottom of the case using 2 screws for each plate from Bag B.
- Secure the floor mounting plates to the floor or a beam using the included screws and anchors. Use 2 for each plate from Bag C.
 |  |
Tips and Suggestions
Installing your Ring Jobsite Security Case away from heat sources to minimize the chance of overheating.
- Keep the case away from standing water. Use it in a dry area whenever possible.
- Use the case under a roof or protective awning.
- Don’t put the Jobsite Security Case inside another enclosure. It can interfere with fan operation and Alarm Pro’s cellular and wifi signals.
- Use the included lock and brackets to secure the case as needed.
- Use this product with ground fault circuit interrupter (GFCI) outlet.
