Ring DIN Rail Transformer (2nd Generation)
The Ring DIN Rail Transformer (2nd Generation) is designed specifically for Ring devices, and allows you to hardwire compatible Ring Video Doorbells to your mains circuit using existing doorbell wiring, for non-stop power and protection.
Devices compatible with the DIN Rail Transformer (2nd Generation)
- Ring Video Doorbell Wired (DIN Rail Transformer required if your existing doorbell system is volt-free at the doorbell, or does not include a step down transformer to lower the voltage to 8 to 24 VAC)
- Ring Video Doorbell Pro (DIN Rail Transformer required if your existing doorbell system only works at 8 to 12 VAC)
- Ring Wired Video Doorbell Pro (formerly Video Doorbell Pro 2) (DIN Rail Transformer required if your existing doorbell system only works at 8 to 12 VAC)
- Ring Wired Video Doorbell Plus (2nd Gen) (DIN Rail Transformer required if your existing doorbell system only works at 8 to 12 VAC)
- Ring Battery Video Doorbell, Ring Battery Video Doorbell Plus and Ring Battery Video Doorbell Pro (DIN Rail Transformer required if your existing doorbell system is volt-free at the doorbell, or does not include a step down transformer to lower the voltage to 8 to 24 VAC)
More information on hardwiring your Video Doorbell and compatibility
How to install your Wired Video Doorbell Pro or Pro 2 with a DIN Rail Transformer
If you already have an existing doorbell, your new device can be installed with a DIN Rail Transformer. This is included with Ring Wired Video Doorbell Pro (formerly Video Doorbell Pro 2), but must be purchased separately if you have any other doorbell model.
Purchase a DIN Rail Transformer
For your safety, only use an existing doorbell transformer within the supported range (16 to 24 VAC, 50/60Hz, 10VA to 40VA) or DIN Rail Transformer (24Vdc, 420mA) to power your Video Doorbell Pro or Pro 2.
Using incompatible power sources can damage your device and cause electric shock.
1. Find your doorbell chime
Ring your existing doorbell and listen for the chime. If it rings, you'll know your existing doorbell system is working. Follow the sound to find your chime and make a mental note of the location.
2. Locate your existing transformer
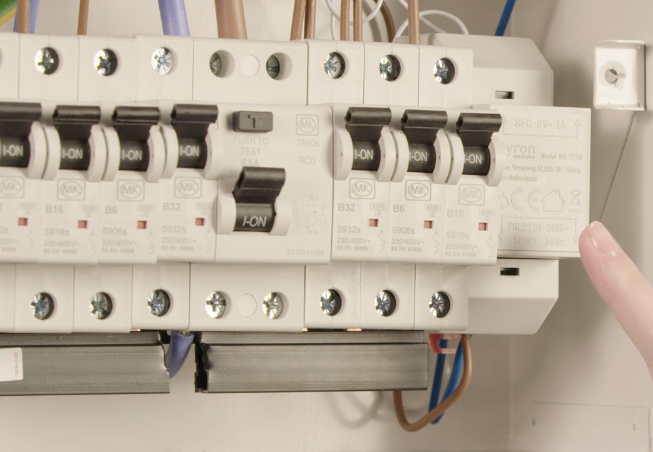
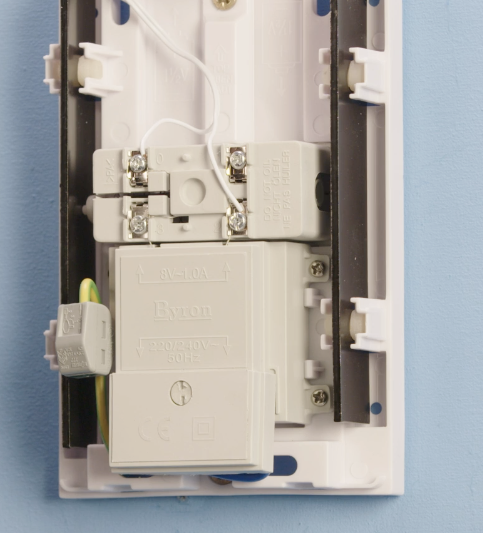
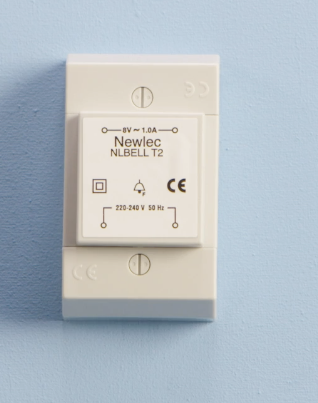
Your existing transformer can be found in your consumer unit, combined with your existing chime or mounted separately, and usually has a label saying 8V or 12 V AC. The photos below show how your transformer may look.
3. Turn off power at the consumer unit
This can be done by turning off the mains power switch, or by turning off the power coming into your home at your electric meter.
4. Bypass your existing chime
If your transformer is in your consumer unit or mounted separately to a wall, make sure to follow this step.
Your existing chime needs to be bypassed because the DIN Rail Transformer is powerful and runs on DC rather than AC current. Not bypassing will cause damage to your existing chime.
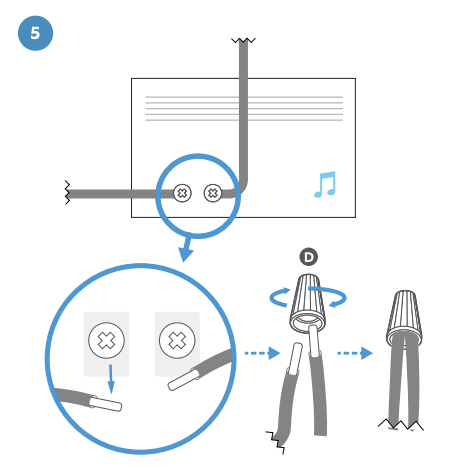
To bypass your existing chime, unscrew the wires from your existing chime. Twist them together using a wire nut.
5. (Optional) If required, remove your transformer from its housing unit.
Traditional DIN Rail transformers are 35 mm wide. The Ring DIN Rail Transformer can be removed from its housing to be a more compact 17.5 mm.
To remove, spread the two sides of the housing outwards, and push the transformer unit up from below.
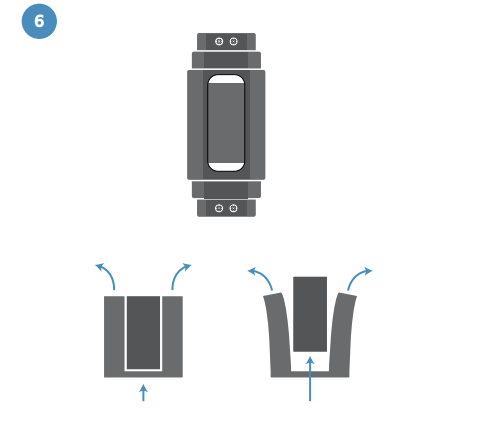
6. (Optional) If required, use an Enclosure for DIN Rail Transformer.
Chime units are often bigger than the DIN Rail Transformer, so when they are removed from a wall they can leave an unsightly, unpainted gap behind.
Ring’s Enclosure for DIN Rail Transformer is designed to house your DIN Rail Transformer, providing an aesthetically pleasing solution. With its minimalist design, it blends into the background while being large enough to cover the footprint of your existing chime.
7. Remove the wires from your existing transformer.
Locate the output cables that are connected to your doorbell. These may be connected to the terminals marked ‘output’, ‘8V AC, 12V AC’ or a similar low voltage. Disconnect these cables and put them to one side.
Remove the 230 V high voltage line (brown) and neutral (blue) cables from the input terminals and place to one side, ensuring that these are not touching any other cables, metal or conductive surfaces.
Depending on the age of the home, the wires may not match the colours described. Consult an electrician if you are unsure.
8. Remove your existing transformer.
Remove the existing transformer by unclipping it from the mounting rail. You may need to use a flat head screwdriver to do this.
9. Replace your existing transformer with the DIN Rail Transformer.
- Pull down the white tab at the bottom of the unit.
- Place the unit at an angle on top of the rail.
- Push the unit flush against the rail.
- Push the tab up to lock in.
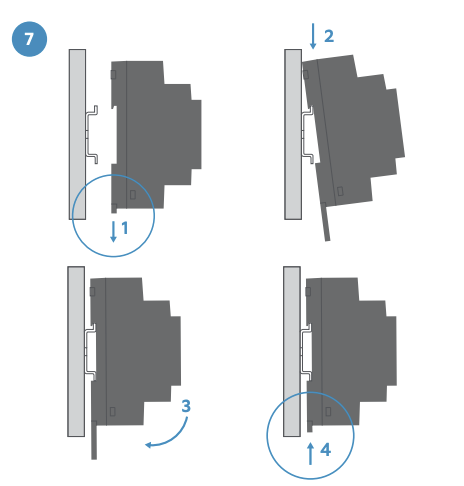
10. Reconnect the wires.
- Connect the previously disconnected 230V high voltage line (brown) and neutral (blue) cables to terminals L & N on the bottom of the transformer.(ensure these are going into the correct input terminals).
- Connect the doorbell wires to + & - (doorbell wires can go in either terminal).
- Ensure the terminals are tightened properly with a screwdriver.
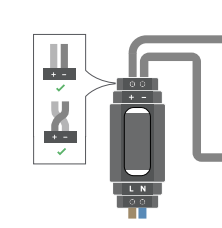
11. Put the cover back on your chosen enclosure and ensure everything is fully installed before turning the power back on.
You are now ready to continue installing your Video Doorbell.
